

Below you will find step for step instructions to build a cost-effective DIY solar pool heater that will work just as well as the commercially available options.
We have also included handy shopping list for the project to ensure you don’t find yourself with all the motivation and only some of the materials.
How does it work?
The DIY solar pool heater below uses a simple process of circulating your pool water through coils heated by the sun, transferring the heat to your water before pumping it back into the pool to raise the pool temperature.
The water will be collected from your pool using a pool pump which will then transfer some or all of the water it filters through the connected black tubing. This process can be controlled via the connected valve or by simply switching the pump on and off.
The longer the black pipe, the more heat will be transferred to the water, leading to a warmer outcome at a higher water flow rate.
This process allows cold water to be removed from your swimming pool and replaced with warm water as depicted in the diagram below:
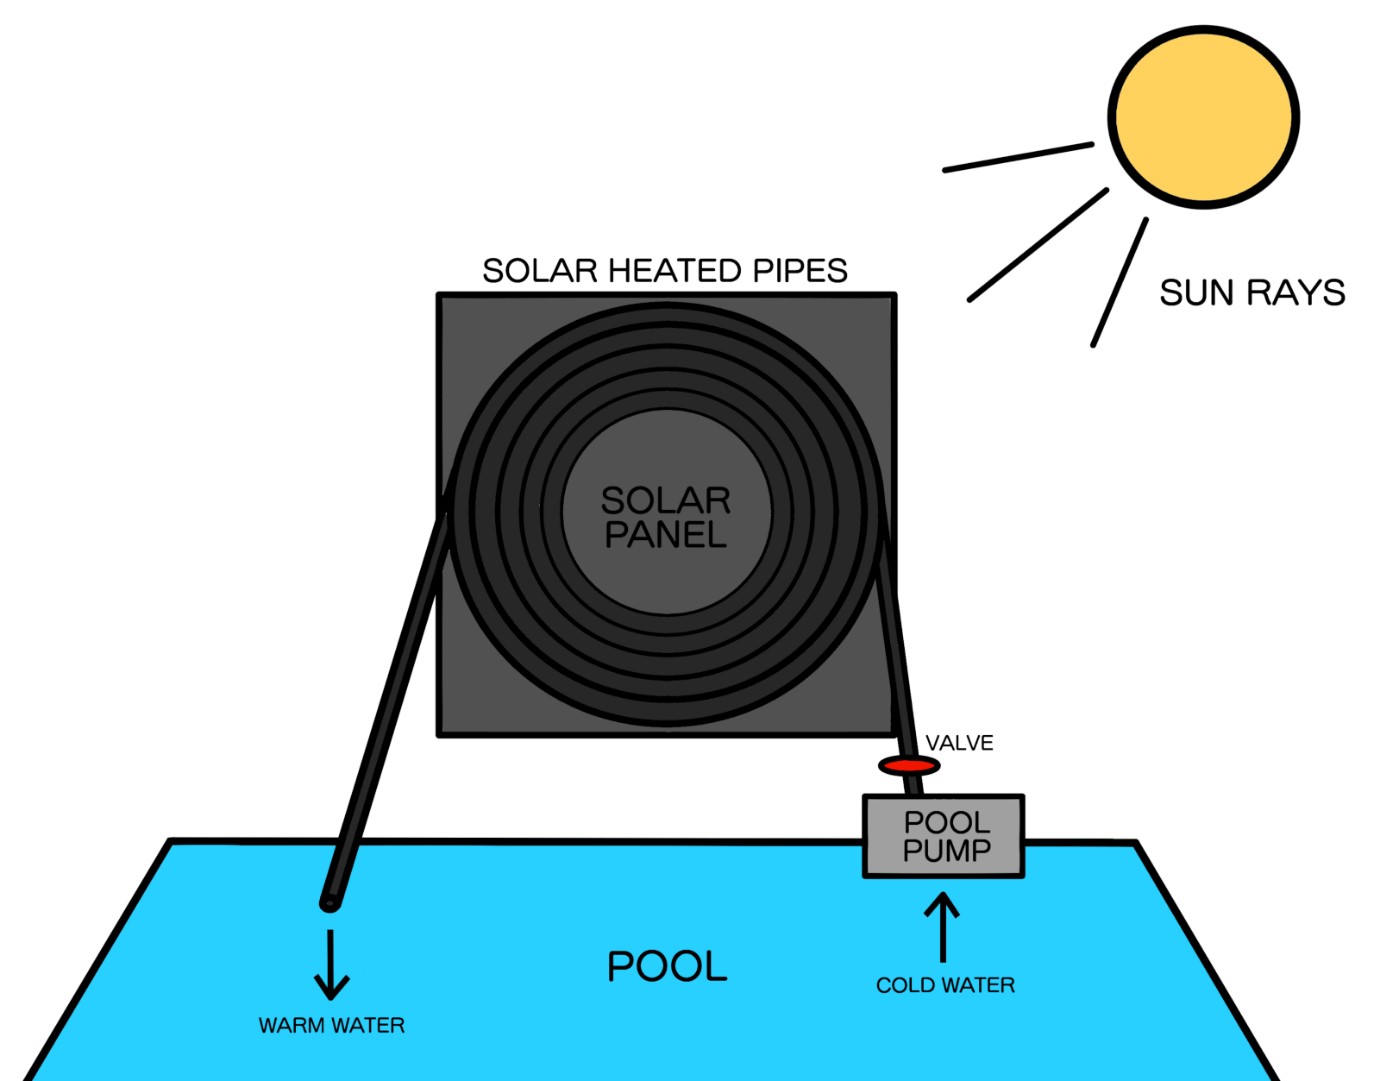
DIY Solar Collector
Material list:
Optional
There are also some commercially available components that will cut down on labor without significantly hiking up the costs such as these ready-built, simplistic panels:
- Intex Solar Heater Mat for Above Ground Swimming Pool
- GAME 72000-BB SolarPRO Curve Above-Ground Pool Heater
Step 1 – Prepare Your Plywood

Take your 4 by 4 sheets of plywood and spray the entire surface on the one side black. This will maximize your solar pool heater system’s heat absorption, whereas lighter colors would reflect the heat.
Many people choose to add about an inch of raised framing to the edges of plywood to further secure the tubing, but this step is optional.
Step 2 – Add the Tubing
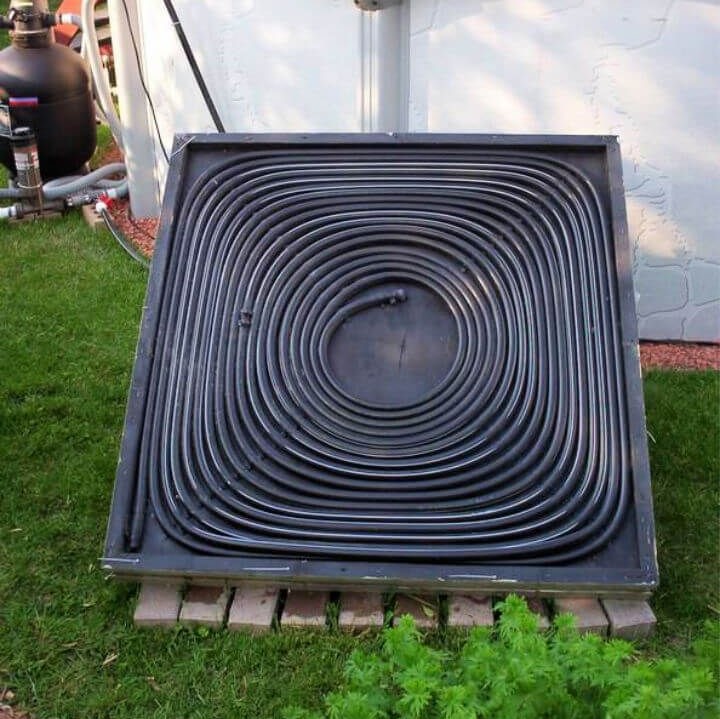
Next, you want to take 200ft of your black tubing and coil it up laying flat on the plywood surface. It is important to not have any overlapping tubing, as you want as much tube surface as possible to be exposed to the sun.
While only 100ft is necessary to form the coil, you would benefit from having a longer piece that extends to your pool or connects to the next coil panel.
It is absolutely essential for this tubing to be black in color, as this is the feature that will attract the most heat to your DIY solar pool heater system.
Step 3 – Secure the tubing
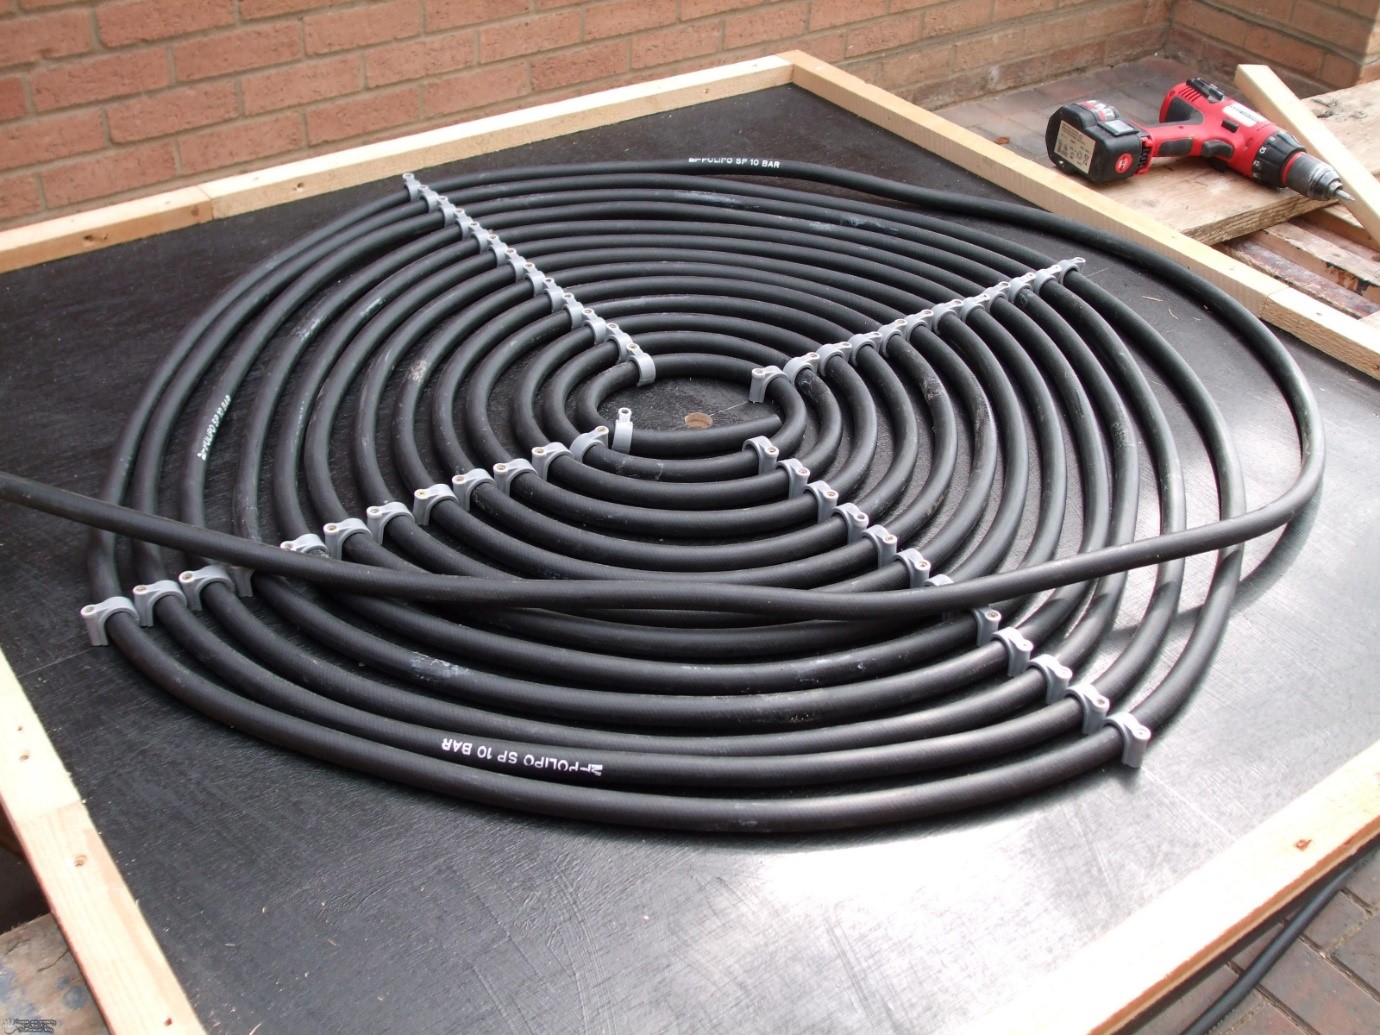
Once you are comfortable with the position of your tubing, you need to secure it in place. Conduit clamps are tried and tested for this task, but people have also found success with other products such as UV-resistant cable ties.
Simply place your clamp over the pipe and drill screws into the holes on either side. The plywood should make this a fairly simple task.
In terms best clamp layout, we would suggest placing the clamps in an “x” formation, meaning you should have 1 diagonal row of clamps holding down each corner of your coiled tubing. We would also suggest securing each individual tube loop, meaning that every loop of your coil will require 4 conduit clamps.
Step 4 – Place your solar panels

Solar pool heater panels, also called solar collectors, can’t simply be placed in a sunny spot on a flat surface, but rather need to be at an angle to produce the best results. This gradient is determined by your location.
In the summer, you need to subtract 15 from your location’s latitude to determine the angle of your solar heater panel, while in the winter you add 15 to your latitude. For instance, if my latitude is at 30 degrees, I will need to place my solar panel at an angle of 45 degrees in the winter and 15 degrees in the summer for optimal sun exposure.
This is where we will let your creativity run free, as there are quite a few methods of achieving this and the one that best suits you depends on the materials you have, labor you wish to put in, and your overall backyard aesthetic.
Some people build elaborate support systems out of materials like wood and steel to display their DIY solar pool heater, while others simply lean their panels up against a fence. The prior may offer a more professional appearance, but the latter is certainly more adequate for users hoping to put their pool heater away during seasons when it’s not needed or not of much use.
There are also some commercially available solar panels support structures that can work perfectly for your DIY panels.
Step 5 – Connect to your pool pump

This is where you may need a few plumbing adapters to make sure everything is compatible, but the most important thing is ensuring your have a valve controlling the water going through your DIY solar heating system.
There are a few reasons a valve is such a necessity, the main one being that you want to be able to use your filter separately from your heating system in chilly weather or when you are happy with the pool water temperature.
Many users recommend installing a valve where your tubing leads into your swimming pool as opposed to right by your pool pump, as this allows you to control the water flow rate and how long the water stays in the coil. If the pool water takes longer to circulate through the coils the water output is considerably hotter.
However, many people have found that the slow rate at which the hot water enters the cold water actually just leads to more heat loss, while slightly cooler water entering the pool at a faster flow rate has more of an effect. This is a fine balance and the experience will differ for each pool owner.
Optional steps
Step 6 – Set up a pool pump timer
This step is completely optional, as a fair number of solar pool heater users simply leave their pump running 24/7 or manually turn off the valve to the heating system when the weather becomes cooler.
It is definitely not recommended to use your solar heater when the sun stops shining, as these DIY coils can actually release heat from your pool water back into the atmosphere should it be colder than the water itself.
This is why many people install timers on their water pumps to ensure they are running and circulating pool water through the coils during the hottest hours of the day, but automatically switch off from late afternoon until early morning.
It is still important to manually restrict pool water to the heating system during the cold and dreary seasons by closing the valve, but installing a pump timer will certainly help you make the most of your heating system the rest of the year.
Step 7 – Install plexiglass over your coils
This involves covering all your solar panels in a clear material such as plexiglass and securing it to the plywood. This step will be made easier if if you do choose to install raised framing on your plywood during step one, as it provides a place to secure your plexiglass.
This step helps your DIY solar pool heater harness just a little more solar heat by preventing wind from cooling the coils down, while also trapping heat inside the system.
While many users are satisfied with their solar pool heater results without incorporating plexiglass, it is still raved about by the users who have tried it.
Step 8 – Get a pool cover

Pool covers undeniably have a few drawbacks such as their short lifespan and high cost, but there is no denying that they add to the pool heating experience.
Insulating pool covers reduce evaporation, thereby helping the pool water heat up faster while also retaining warmth during the night.
Black pool covers may be best for this purpose and are sure to show notable results in smaller and above ground pools. Black colored pool covers do, however, wear down even faster than other pool covers due to the effects of the sun on its material.
Pool covers have the added bonus of keeping debris out of your pool water, but many large pool owners don’t find them to be worth the investment and labor.
Things to consider
How many coil panels do you need?
This is a heavily debated topic, but your solar pool heater should typically be 50%-75% of your pool’s surface area to provide adequate heating. This number is purely dependent on the surface size of your pool and does not rely on depth.
An average to large pool will need approximately 10 coils, while you can get away with much fewer for smaller pools.
Ultimately, this process will involve a bit of trial. We’d suggest starting with a panel surface of half of your pool size and adding on from there to increase results.
Costs
Below we have compiled the costs of producing one coil panel:
- 200ft ½” tubing: $20
- 1 piece of 4 by 4 plywood: $65
- Conduit clamps: $11
- Matte black spray paint: $7
- Total for one coil solar panel: $103
As you can see, this is a considerably more budget friendly venture than buying commercial solar pool heaters that you can expect to pay anywhere from $4000 to $9000 to purchase and install.
These prices will, of course, vary based on what you can find in your local hardware store, as our prices are based solely on online products. Certain products such as the plywood would be more advisable to shop for locally.
Other costs will include the pool pump ($75 to $150) if you do not already have one, as well as any plumbing adapters you may need to ensure your water is able to flow from your pump to your black tubing.
If you still have money to spare after installing the basics, you can turn your focus to the more optional items that might add to the overall experience of owning a DIY solar pool heater.
Weather
The one major drawback of any solar pool heater is that it can only function as long as your weather plays along. This means that the purpose of a solar heater is not to heat up your swimming pool in the winter, but rather to extend the swimming season by a couple of months.
Keeping your solar heater running in cold weather or in the absence of sunlight may just have the complete opposite effect as the pool water movement allows more heat to evaporate and exposure to the coils cooled by weather will lower the water temperature even more.
Electricity
A solar pool heater is predominantly reliant on energy from the sun, but there is still some electricity use involved to run the filter pump.
If you want your pool system to be entirely reliant on the sun’s energy, you may want to look into purchasing solar panels to fuel your pool pump. These will ensure that your pool filter is running and heating the pool during the sunny hours and automatically switches off when there is no more sun to run your pump and heat your water.
If you value the portability of your solar pool heating system, you will likely also want portable solar panels. Unfortunately, this will require a hefty initial investment as you will need at least six 200W panels to run your pump, but a solar powered filter pump will completely eliminate all pool heating related costs.
If you find that your DIY pool heating system is a pool necessity, you may want to consider going completely off the grid in the future.
Conclusion
Installing your own DIY solar pool heater is a worthy venture that will not only increase your family fun, but also make your initial swimming pool investment seem much more worth it.
We hope this inexpensive swimming pool heating method becomes a fun family project that you reap the benefits of for years to come.